

Table of contents
1. Introduction
After spending countless hours developing this component over the past month, experimenting with different approaches, testing and making sure that the component is implemented correctly, writing the documentation, and developing multiple demos to showcase how it works, I'm excited to announce the react-next-parallax component and the corresponding NPM package.
react-next-parallax uses react-next-tilt (introductory blog article) as the foundation and adds support for having a dynamic parallax scene in a confined frame. It also supports different animations like movement, opacity, scale, rotation, and skew based on the tilt angle. It is highly customizable, offering settings for different animation modes and speeds on top of all the other customizations offered by react-next-tilt.
To learn more about the component, how to install and use it, and all the different props and settings, you can check the package readme on NPM.js:
react-next-parallax package on NPM.js
As the old saying goes: "A live demo is better than a thousand words". To see the component in action, you can check any of the following demos:
Main Demo Attributes Demo Control Element Demo Storybook
In the rest of this article, I will go over the development process in more detail.
2. The problem solved by react-next-parallax
You can set up a parallax tilt effect using only react-next-tilt (as you can see on its demo page) by translating/moving the elements along the z-axis. but you will run into two main problems when setting up parallax scenes this way.
Let's say we have a scene with many layers, like this:

By translating/moving the elements along the z-axis (giving layers in the front higher translateZ() values) we can achieve a parallax effect:

but we have already run into the first problem and that is:
1. Scale Problem
When elements are translated along the z-axis and are closer to the viewer, they appear to be bigger. it may be fine in other situations, but when we have a scene like this, we don't want the scale of the elements to change because then we would have to adjust the size of each element by scaling it down to achieve the original composition.
2. Containing elements within a 3D frame
The biggest problem we run into is the fact that we can't hide the parts of the images that are outside the tilt. You may think we can use overflow: hidden but as I've mentioned in another post, using it will flatten the image and remove the parallax effect.
Technical note: You may be thinking that this is possible by putting the
preserve-3delements inside a container and applyingoverflow: hiddento it, but it's not:
- Putting the tilt inside a parent/container with
overflow: hidden:While the parent does hide the content outside of it, and the 3D effect is preserved, the content is not confined to the tilt element but to the parent. meaning it overflows the tilt element but then is cut off by the parent's bounds which doesn't look good.
- Using an intermediary element with
overflow: hiddeninside the tilt containing the 3D content insideThis could look like it works if you were dealing with a static scene. because the elements look like they're in 3D space and they are, just not in the 3D space we want!
When we put an
overflow: hiddenelement inside apreserve-3delement, it breaks the 3D stack at that point. and when we have anotherpreserve-3delement inside of it, a new 3D stack is created. so what happens is that the elements inside of it are transformed in the 3D space but then get flattened. and the flattened result is put inside the parent's 3D space. so they don't move depending on the tilt angle. (imagine rotating a TV showing a 3D scene inside a room)
So, the question is: "How can we have overflow: hidden and 3D effect at the same time?"
In order to answer this question, we first need to know what 3D is in the first place.
3. What makes us think a scene is in the 3D space
We look at our screens which are flat 2D surfaces but can tell if what we're looking at is 3D or not. there are two main factors that help us distinguish 2D from 3D:
1. Scale
Elements that are closer to us appear bigger and vice versa, elements that are further away appear smaller. but we don't need this in our scene as mentioned before so we can ignore it.
2. Movement during rotation
Elements that are closer to us move more according to the rotation angle and elements that are further away move in the opposite direction. elements in between have less movement. (If you hold a pen with the tip facing you, when you rotate it from the middle, the tip will move in the rotation direction, the middle will not move and the back will move in the opposite direction. and the more the rotation angle, the higher the movement difference will be.)
We can mimic this behavior by moving some elements in the rotation direction and some in the opposite direction. the elements in between will have less movement or no movement at all. the amount of movement will determine how close or far the elements are from us. (Note that since the container is rotated/tilted already, this is the additional movement on top of it)
I got this idea after checking Atropos and seeing that it uses
translate()to achieve a similar effect.
This is the main idea and the starting point for this component.
4. Attributes
I decided to use data attributes to implement the idea similar to how Atropos does it. I also tried to keep the value format similar but I've not checked how they are implemented in Atropos, so there could be differences.
- Offset
To implement this idea I've used an offset attribute that can be assigned to each element we want to be moved according to the tilt angle:
<img data-parallax-offset="±number" />
We can then calculate the amount of movement in the X/Y axis using this simple formula:
translate = tiltAngle / tiltMaxAngle * offset
/*
 * Note:
 * tiltAngle is in the [-tiltMaxAngle - tiltMaxAngle] range.
 * translateX is calculated using rotation around the Y axis and vice versa.
 * We have to reverse/negate the angle around the X axis in the calculation.
 * We set the value as percent and because of the way translate() works, it'll be a percentage of the dimension of the element itself (width for translateX() and height for translateY())
 * This value is multiplied by the offsetMultiplier that is mentioned later.
*/
This way elements with higher offset values will move more at higher tilt angles and will appear to be in the front, and elements with a negative offset will move in the opposite direction and will appear to be in the back. giving the illusion of being in 3D space.
You can see this attribute in action in the Offset Demo
- Opacity
I noticed that Atropos also has an opacity attribute that can be used to animate the opacity of the element based on the tilt angle (start opacity at center and end opacity at max tilt angle) and I decided to implement the same functionality in my component as well.
<img data-parallax-opacity="start;end" />
For the implementation, I used the same mapping method I used in the development of react-next-tilt.
If we want to animate the opacity from one edge to the other (tiltAngle/tiltMaxAngle = [-1 - 1]) from start to end ([start - end]) we can use this mapping:
Mapping [-1 - 1] to [start - end]: + 1 = [0 - 2] => / 2 = [0 - 1] => * (end - start) = [0 - (end-start)] => + start = [start - end]
And since we want to animate from the center to the edge, we can use Math.abs(tiltAngle/tiltMaxAngle) = [0 - 1] instead and drop the first two steps:
Mapping [0 - 1] to [start - end]: * (end - start) = [0 - (end-start)] => + start = [start - end]
You can see this attribute in action in the Opacity Demo
- Scale, Rotation, and Skew
I also added attributes and animations based on tilt angle for Scale, Rotation, and Skew in a similar manner.
<img data-parallax-scale="start;end" />
<img data-parallax-rotation="start;end" />
<img data-parallax-skew="start;end" />
You can see these attributes in action here: Scale Demo - Rotation Demo - Skew Demo
While implementing these attributes, I kept performance and usability in mind. while animating these attributes makes use of transform functions, my implementation doesn't replace the whole transform property and only overwrites/replaces the required functions so you can use other transform functions at the same time as using the desired attribute. A list of what transform functions each attribute overwrites/replaces is available in the readme.
5. Animation Modes
Since I already figured out how to animate each attribute from edge to edge instead of center to edge, I decided to add this as an option/prop.
I implemented separate modes/calculations for the X and Y axes as well as an option that will animate the value using both X and Y tilt angles (from top left to bottom right).
In total there are 4 animation modes available:
'center-to-edge'
'edge-to-edge-x'
'edge-to-edge-y'
'edge-to-edge-both';
You can see them in action in the Attributes Demo
6. Animation Reverse
After implementing the different animation modes, I thought it could be useful to be able to animate each attribute in reverse.(instead of being the start value at the center and end at the max angle, being end value at the center and start at the max angle, or instead of animating from start to end when hovered from left to right, animating from start to end when hovered from right to left)
I also decided to add fine-grained control over which attribute we want to reverse (because for example after setting up the offsets, we don't want to change it and want to only change other attributes).
In total, animation reverse has 8 modes:
'all'
'all-except-offset'
'offset'
'opacity'
'scale'
'rotation'
'skew'
'none'
7. Multipliers
While making the demos and setting up the scenes I found myself changing the offset values manually a lot to get the effect and movement speed I wanted so I decided to add an offsetMultiplier that allows for easy adjustment of all offset values. I later added a multiplier for all other attributes as well.
You can see the offsetMultiplier in action in the Attributes Demo
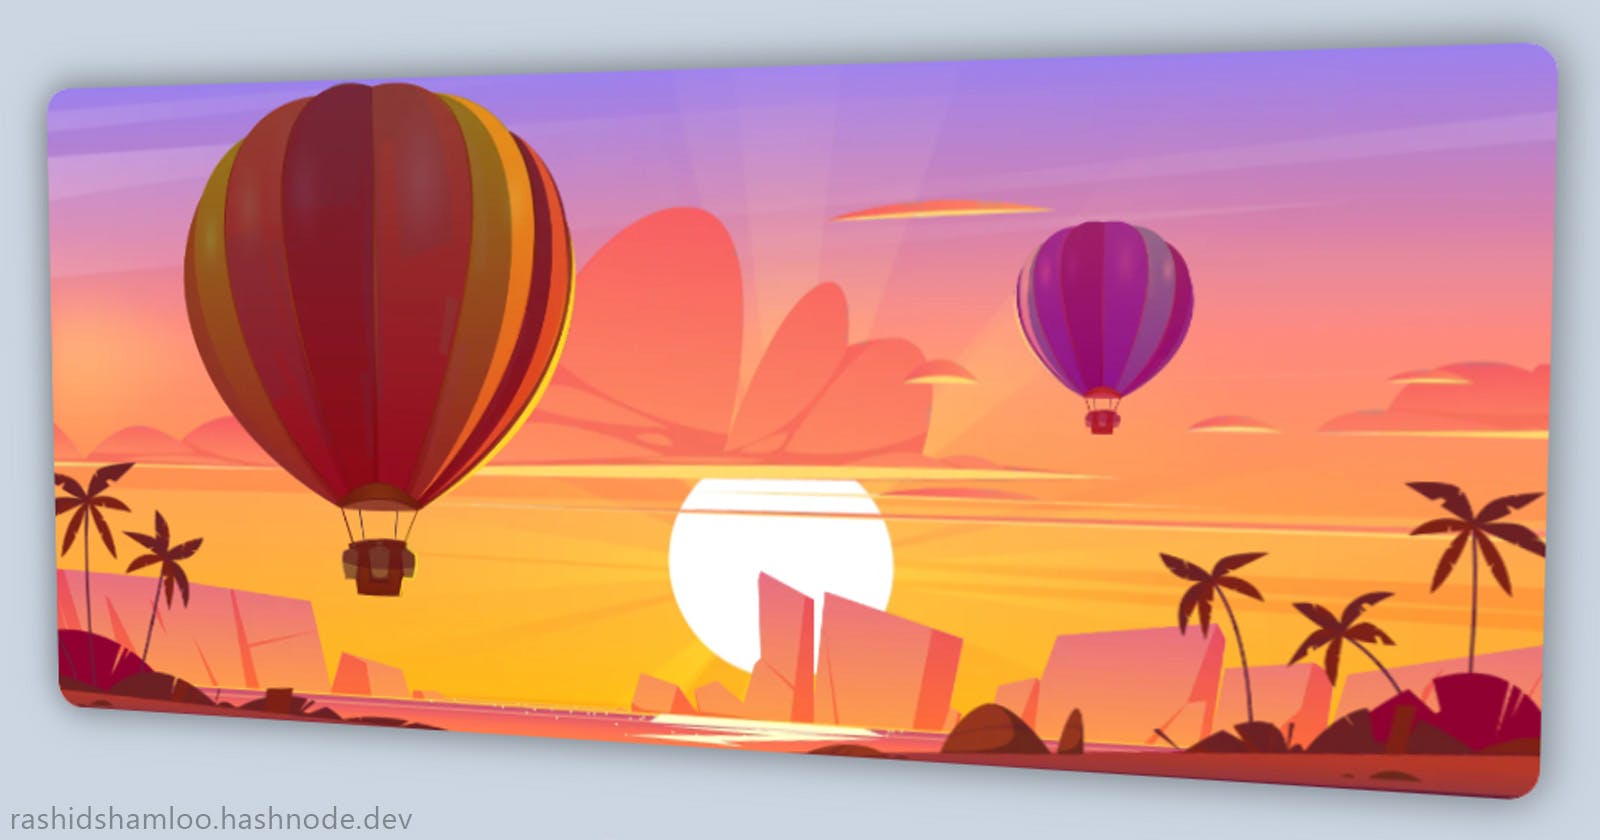
8. Animating elements that are being manipulated by the component
In the main demo for the component, there are two balloons that I've animated using CSS keyframe animations and transform: translateX/Y() functions. However, one of them also has an offset attribute set so its transform: translateX/Y() functions are also manipulated by the component at the same time.
This caused the CSS animation to override/ignore the transform: translate() set by the component and the element didn't move according to the tilt angle.
I tried using the Web Animation API to animate the element instead of @keyframes but the result was the same. and animating using the left and top properties resulted in jittery/not smooth movement.
I then remembered about the separate translate property we can use instead of transform: translate() and after using it, both the CSS animation and the components translate() manipulation worked at the same time without interfering with each other.
Also another workaround I figured out while writing the documentation is putting the element inside a parent/container and animating it instead of the element itself while the element is being manipulated by the component.
9. Multi-component setup
Atropos has a multi-component demo on its website and after seeing it, I figured I could achieve a similar result with my component, using the controlElement prop I developed for react-next-tilt from the start that allows the component to be manipulated by other elements. That element could be another component as well which means it's a matter of putting multiple components inside another component and setting their control Element to the parent component.
After implementing it, I am really happy with the result. plus I can use all the other attributes I've added to rotate, scale, skew, etc. each of the contained components at the same time which results in really cool effects.
Here is a preview of what it looks like:
I plan to polish it more, add some presets for easy setup and use, and publish it as a separate component.
10. Improvements to react-next-tilt
In the process of developing this component, I needed some extra functionality that I first implemented in this component then ported back to react-next-tilt and added as core functionality which resulted in it gaining some new features including:
Support for setting
TiltRef,FlipTiltRef, andParallaxRefascontrolElement(commit)onReset()callback function (commit)preserve3dEnableprop (commit)shadowTypeprop (commit)'all'position forspotGlarePositionprop (commit)spotGlareSizePercentprop (commit)gyroargument for theonTilt()callback function (commit)
Images used in this article and demos are by Yuliya Pauliukevich on vecteezy.com